|
�
Tri-Wheel Vectoring Robot Building Page
��
�
�
|
| Description |
�
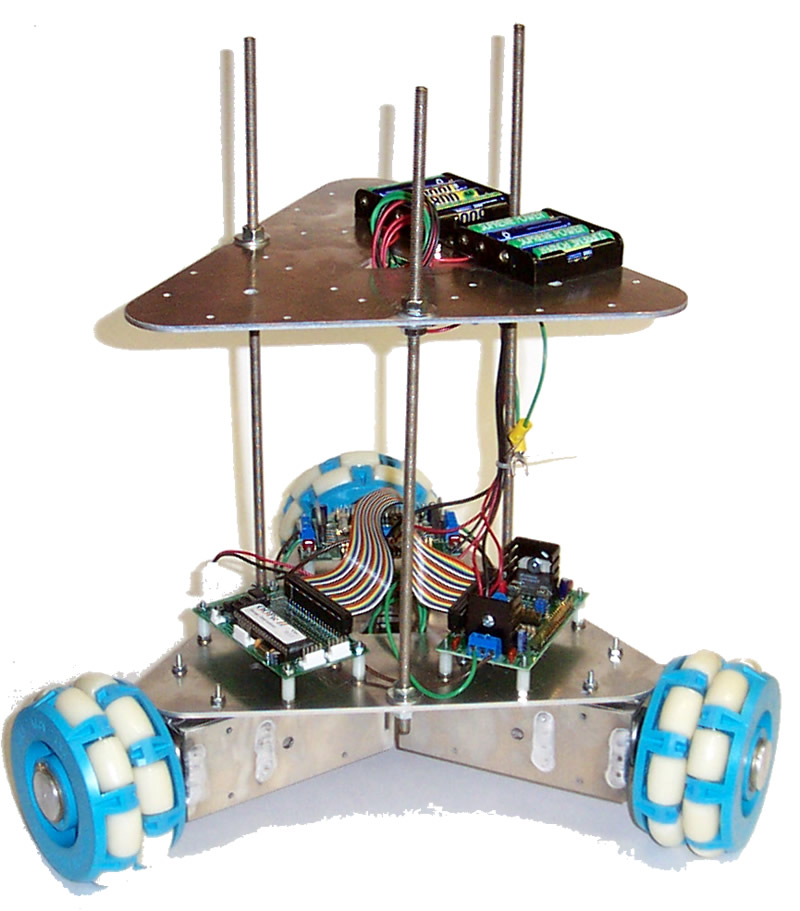
This is a compact robot that utilizes three omni-wheels to vector it in any direction.� By changing the speeds and directions of the motors the robot can drive in any direction without needing to turn.� This makes it very useful for navigating around the house.� It works on any indoor surface or outdoors in short grass, pavement, concrete, etc.� Below are the links to different parts you can add onto the robot platform to customize it to your needs.�
�
To See a picture of the vectoring robot, see our general ATR page.
�
|
| Platform |
The platform can be either aluminum or acrylic.� Only one compact size is available for the tri-wheeled robot.� You can stack the platforms to yield additional room.� The platforms are laser cut to accept a huge array of sensors, controllers, motors, etc.�
�
It is recommended that you get an upper deck and All-Thread hardware package to hold the batteries, there is not much room for them on the lower deck with the controllers.
�
|
|
Triangular Platform - Aluminum |
|
|
Triangular Platform - Acrylic |
|
|
All-Thread hardware kit (used to support/space out the platforms if multiple platforms are used. |
�
|
| Motors and Motor Mounts |
Only our 7.5kg-cm stall torque motor size will fit this kit.� The motor will drive the robot over any indoor surface and most outdoor surfaces.� The motor housing connects the motor to the base platform via pre-drilled holes.
�
|
|
24VDC 195 RPM Gear Motor (~7.5kg-cm stall Torque) |
|
|
Standard Motor Housing (for 7.5 & 35kg-cm stall torque motors) |
�
|
| Wheels and Drive Shafts |
The Omni wheels and shafts are also sold together as one unit.� The shaft comes with a bearing and lock collar that fit right into/onto the motors and motor mounts.� The wheels are 4" in diameter.� The traction wheels are made of durable urethane to help grip the floor.� These wheels also work outdoors.� The wheels are either single row wheels or double row wheels.� The double row wheels provide a little smoother operation, but both work great.� One thing to note with the omni wheels is if you run sideways to a hill, the wheels will side slip down the hill, but if the robot angles up the hill slightly it can overcome this.� If you are ordering omni wheels, you will need 3 individual shaft and wheel sets.
�
|
|
Omni-Wheel shaft combo (single row) |
|
|
Omni-Wheel shaft combo (double row) |
�
|
| Motor Speed Controllers |
For the Tri-Wheeled Robot, you will need a total of three independent motor controllers.� The MD22 and Magnevation drives are dual channel motor controllers, so only two are needed, leaving you a spare channel.� Ideally, three of our our single channel PWM controllers can be used.� See our speed controller comparison page to help you make your decision.�
�
|
|
Devantech MD22 Speed Controller (dual channel) |
|
|
SuperDroid Robots PWM Motor Controller (single channel) |
�
|
| Controller (the brains) |
The controller is the brain of the robot.� Many different controllers can be used with these robot kits.�
- Using the MD22 motor controller you can use an OOPic II, II+ or OOPic-R and control the motors various ways (PWM, I2C, servo pulse).� You can also use the RF04 CM04 combo to supply an RF link to your computer and have the computer control the robot.
- Using the Magnevation motor controllers�or the SuperDroid Robots PWM Motor Controller you can use any PIC such as (an OOPic II, II+ or OOPic-R) device that outputs a PWM (0-5V) signal and digital I/O for direction and brakes.�
�
|
|
The RF04 and CM02 900MHz Transceiver Set is great for linking your MD22s and other I2C devices to your computer wirelessly.� You can then write a program in visual basic or C to control and monitor your robot.� We have a sample program written in VB6 that controls the MD22. �If you use this controller use the MD22 speed controller, not the Magnevation controllers. |
|
And finally, for those who what to cheat or have an alternate method of control, we have RC controllers.�
�
A RC controller can not be connected directly to the motors, you need a motor driver and a RC interface.� The MD22 is a motor controller and RC interface in one, however it does not have much filtering and can cause erratic behavior and reduced control at longer ranges.� We have developed our own RC controller interface that filters the signal to help give better control and longer range and is designed to be used with our PWM drivers.
|
|
4-Channel
|
|
6-Channel
|
�
|
| Controller interface |
If you're familiar with our popular Trekker Robot kits, one thing to consider is you can use an OOPic II/II+ with and OOPic II Expansion board, or an OOPic-R with an OOPic-R Expansion board and drive the MD22s using the servo outputs or I2C and you get all the great features of the expansion boards and your robot will be just like a Trekker only bigger!� You can add all the sensors, etc that the expansion boards support and most of the programs for the Trekker will be applicable.� See our controller hook up page for more details.� These kits also provide you with battery trays for your controller power.
�
|
|
OOPic II Expansion Board |
|
|
OOPic-R Expansion Board |
�
|
| Electrical Power Hookup |
Robots need their batteries.� We sell several different batteries.� The motors require 24V to run.� You can look at the motor pages to see what the current draw is for each motor.� For the Tri-Vector robot kits, since they use small motors that won't draw too much juice, a 1500mAhr battery is fine.� We sell NiMH batteries so you won't have memory issues and will get much better performance from these as compared to NiCad's.� We recommend you get the connectors with them so you can easily unplug them and charge them or swap them out with a second set.
�
24V is too much voltage for the PIC controllers, plus its best to have the instruments and controls on a separate source than the motors.� You can use either a 9.6V battery or a 7.2V battery. The OOPic controller or our expansion boards will regulate it to 5V.� The regulator typically needs at least 6V.� Either battery will go for a very long time depending on how many extra sensors are being used.� Again, the batteries we sell are NiMH batteries, so they won't form a memory and will last a long time.�� We recommend you get the connectors with them so you can easily unplug them and charge them or swap them out with a second set.� If you are going to use an expansion board, they come with battery holders, or you may prefer the battery packs.� We sell single AA NiMH batteries for the expansion board battery trays.
�
We sell plain old transformers for chargers or you can get our automatic peak battery charger.� The peak charger will monitor you battery as it's being charged and shut off when it has reached it's peak charge.� These chargers are close to $200 when bought elsewhere, but we have developed our own charger that does the same thing at less than 1/2 the price.� You can also use a standard transformer and manually disconnect it when the battery has been charged, but you run the risk of destroying your batteries if you forget to take them off the charger.
�
Finally, you will need some wire, fuses, and switches.� The kit we sell is simple and will allow you to turn you robot on and off and protect everything with fuses.
�
| Electrical Power Hookup Kit |
|
|
Electric Power Hookup Kit |
| Drive/Power Batteries |
|
|
12V 2200 mAHr NiMH Battery |
|
|
24V 2200 mAHr NiMH Battery |
|
|
12V 4500 mAHr NiMH Battery |
|
|
24V 4500 mAHr NiMH Battery |
| Controller Batteries |
|
|
7.2V 2200 mAHr NiMH Battery |
|
|
9.6V 1500 mAHr NiMH Battery |
|
|
AA batteries for Expansion boards |
|
|
8 AA batteries and charger kit for Expansion boards |
| Battery Chargers |
|
|
9V 1000mA Transformer for 7.2V and 9.6V batteries |
|
|
Standard Battery Charger (14V) for 12V batteries |
|
|
Standard Battery Charger (24V) for 24V batteries |
| HiTec Battery Chargers |
|
|
100W Switching Power Supply |
|
| Electrical Motor Hookup |
Electric noise is one of the most frustrating issues when working on robots with DC motors.� The EMF coming from the motors will reek havoc on the microcontrollers, any RF equipment, or other sensitive electronic equipment.� We recommend you use the following kits to wire your motors.� These kits will provide the wiring from the speed/motor controller to the motors.� You will need one kit per motor.� Follow this link for more information on how to hook up the motors.
�
|
|
�Electric Motor Hookup Kits |
�
|
| Controls Hookup |
You need to be able to hookup the controllers (OOPic or RF link) to the motor speed controllers (Magnevation controller, the SuperDroid PWM, or the MD22).� There are many ways this can be accomplished.� For selecting the best method for your application, see our motor controller page.
�
|
|
�40 Pin Ribbon Cable (double ended) |
|
|
�40 Pin Single Ended Ribbon Cable Hookup Kit |
|
|
�Molex Friction Lock Connector Assortment |
|
|
�Molex non-directional Connector Assortment |
|
|
�SuperDroid Robots PWM to PIC Hookup Kit |
|
|
�SuperDroid Robots PWM to RC Hookup Kit |
�
|
| Controller cooling and noise suppression |
This is an enclosure that acts as a Faraday cage helping to protect it from electronic noise.� With an optional fan it can also be used to help keep your controller cool.� It also protects your controller from physical harm.� This isn't typically a mandatory part, but just adds further protection.� It can always be added later if you find out you need it.� We like putting our motor controllers in them to help isolate electric noise and provide forced cooling on the electronics.
�
|
|
�Controller Cooling and Noise Suppression: 4"x2 1/4"x2 1/4" |
|
|
�Controller Cooling and Noise Suppression: 5"x2 1/4"x2 1/4" |
�
|
| Hardware |
The final item you need to make you kit complete is a hardware package.�
It includes nuts, bolts washers, nylon spacers (for isolating your electronics and controller boards), cable ties, and cable hold downs.
�
|
|
Hardware Package (mounts most components to the base robot base). |
|
|
All-Thread hardware kit (used to support/space out the platforms if multiple platforms are used. |
|
|
Servo Standoff Hardware Package (used to mount servos onto the base of the robot). |
�
|
| Sensors |
In order to make your robot autonomous, you will need to add sensors.� You can always add sensors later.� Be sure to use sensors that are best suited for the micro controller you have selected.� If you are using an OOPic, all are sensors can be bused on the controller with a little wiring.��We recommend using one of our expansion boards as discussed above, then all the Trekker sensors and LCDs, etc will plug directly into the expansion board.�� If you are using the RF04 CM02 Telemetry kit, you should only use sensors that are I2C, such as our SRF08 ultrasonic sensors.
�
�
|
| Cameras |
Nothing is better than a wireless camera to see what your robot sees.� We have a large variety of wireless camera including pan and tilt systems.
�
�
|