

|
|
|

Build an Autonomous RobotSummaryAutonomous robots are a unique and dificult challenge by any measure. They requre a precise blend of mechanical, electrical, and software engineering. For the DIY robot builders we sell all the controllers, sensors, etc. that you will need to build your own autonmous robot! We also provide an assortment of example code to get you up and running. Have questions? Need additional sample code to get you going? Please visit our forums to post about your project or to request additional sample code.
Sections on this page:
 
DIY Project ExamplesThe Squirrel ChaserThe squirrel chaser is a fun project to practice autonomy. One where we plan to document every step of the way. We're making all of our code and schematics open and available for any hobbyist, entusiaast, and/or student to have complete access to how to build and program an autonomous robot. The idea is to create a fun project to track moving objects and to incorporate as many of our sensors as possible. The robot features an array of scanning sonic sensors for object detection, CO sensors, GPS monitoring, and on-board computer with a touch screen interface. Feature creep is welcome! Keep up to date with our progress by visiting the Squirrel Chaser's product page here 
Promotional RobotRecently we ran a promotion to give away an Arduino powered WiFi Robot. The robot features a four wheel drive Mecanum wheel vectoring chassis to better enable autonomous wall following and WiFi control using an on-board router and IP camera. In the spirit of open source, we've made the entire project available to download on our GitHub. We have a dedicated support page where we provide information on the design process, design decisions, and how we built the robot. This autonomous Arduino Mega powered Mecanum wheel robot platform is designed and fabricated in North Carolina, USA and fully supported by SUperDroid Robots, an industry leader in robotics. 
Autonomy Basics: Sensing the Outside WorldIn order to achieve any level of autonomy the robot must have some form of feedback in order to navigate the outside world. Otherwise you're stumbling in the dark and making guesses on what to do next. The most basic form of sensor is the contact sensor such as a limit switch. This allows your robot to know when it comes into contact with an object by physical depressing a switch. The downside to using a sensor like this is that it can be mechanically difficult to align the sensor right and you have already collided with the object. Because of this you're much more limited in speed if you want to prevent your robot from causing damage to itself of its surroundings Moving on from contact sensors, we need to be able to detect obstacles from a distance. This is achieved by using a sonic sensor like Max Sonar's ES4 Ultrasonic Range Finder or an infrared sensor like of Sharp's IR Analog Distance Sensors. Both types of sensors have their benefits but IR sensors tend to have a greater range of operation an can offer a more focused and defined field of view. Moving forward with IR sensors, the emitted light can be focused and then swept across a field of view. When sampled properly, this field of view can provide us a more detailed data about our surroundings without needing to move our robot. This kind of sensor is called LiDAR. LiDAR is a portmanteau of "e;light"e; and "e;RADAR"e;. An example of this is Hokuyo's URG-04LX Laser range finder. A downside to using a more advanced sensor like a LiDAR is that they require a much more sophisticated back-end in order to process the data. A sensor like this typically requires a full computer, single-board computer, or an FPGA based solution in order to handle the sheer amount of data that it produces. Just detecting the objects near the robot is not enough to achieve a sophisticated autonomous solution. We need a way to verify that we've actually moved. Otherwise our motor could be stalled and non-operational and the robot wouldn't know that anything was wrong. The basic go-to sensor for this would be an encoder. An encoder watches the shaft of the motor or the teeth of a gear and produces ticks for each revolution or portion of a revolution. A simple way to achieve this is the use of one of our encoder equipped motors. Using an encoder can be tricky. It takes a relatively fast processor and even then, missed counts WILL happen. Especially whenever you perform time consuming actions like a Serial.print() on an Arduino. A solution for this would be to use one of our encoder buffers. What these enable us to do, is to have a secondary chip take care of all of the encoder monitoring for us and then we can simply query the current position over SPI at our leisure. Then we can keep accurate count of a fast motor with your basic Arduino Uno. Now that we have methods to know if there are objects near us, and we know that our wheels have actually moved, we STILL need some way to verify that we have actually moved. Without this our wheels could be spinning in place and our robot thinks everything IR running fine. To do this we need a positioning sensor. Positioning sensors come in various shapes and sizes. Your generic sensors will be accelerometers, gyroscopes, compasses, and GPS. Accelerometers tell us how much we're accelerating (as per the name). Gyroscopes can provide us incredibly accurate information on our orientation. This is an absolute must when operating on anything but a two dimensional plane. Compasses and GPS provide us with a global frame of reference to be able to orient ourselves properly. Autonomy Basics: State MachinesNow that we have our methods to sense the outside world, detect and verify movement, we need a logical and effective method to develop our algorithm coordinate movement of our robot. This logical coordination can be achieved using something known as a state machine. A state machine provides us an organized chart, or flow diagram, to determine what actions are to be performed and when. Take, for example, the state machine below for a garage door opener. Say, we're in a stationary and CLOSED state, we sit in this state until we're commanded by the remote. This is indicated by the outward arrow labeled pushButton. When command we change our state from CLOSED to OPENING. When opening, we continue to open unless commended or we complete our operation. This is a fundamental model for developing an autonomous solution. If you do not have a clear defined structure, a clear plan set before you touch the keyboard then you will be stumbling in the dark. Develop a plan and then implement. 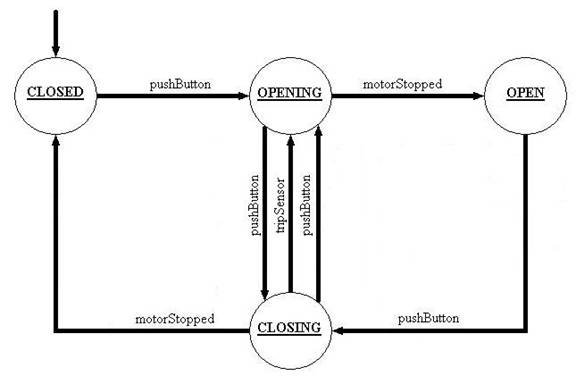 Now that you have your plan, you know what you want your robot to do. The next step is to move our conceptual drawing to code. For a basic robot, the structure can be setup as a case statement in your main program loop that would then call a function associated with that position in the state machine. To handle the changes in state, we already have our logical flags and conditions laid out in the state machine above. These would then be implemented within our state functions.
|
|
|
Robots, Parts, & Custom Solutions


##GOOGLEPLUS##
##PINTEREST##
